How to Anonymize Employee Data for ChatGPT
- 10 Nov 2026
- 10 mins

Over the past 6 months, HR professionals have repeatedly told me they want to use AI to analyze employee data, but they fear exposing personally identifiable information (PII). When I ask what holds them back, their reasons are always the same: they don't know how to mask the data safely or how to match the AI's findings back to specific employees afterward. As a result, they default to analyzing data manually in spreadsheets because it feels safer.
Their concern is valid, as sensitive employee data frequently ends up in AI tools. According to Harmonic Security's study of AI prompts, 27% of prompts containing sensitive information included employee details such as performance reviews, hiring decisions, and bonuses.
In this edition, I'll show you how to anonymize employee data for ChatGPT, Claude or Gemini, step by step, and I’ll use the example of a salary band review. You can easily run this analysis in a spreadsheet without AI, but it's a simple way to show you how anonymizing data works. These same steps work for any analysis you run in AI using sensitive employee data.
I've also included the Google Sheets templates shown in the screenshots below. They include every formula built in and a sample company of 47 employees. I recommend downloading them to follow along as you read:
The Fields That Give People Away
In a startup comp file, job title, hire date, and location can identify someone as easily as their name.
In my sample template, even after removing names and emails, keeping each employee's title, department, city, and hire date leaves all 47 employees easily identifiable. That is because no two people share the exact same combination of those details. For instance, the company has only one Accountant and one Staff Engineer. Anyone looking at that file or the AI's response can immediately figure out whose salary they’re looking at.
Small teams create another problem. Even when job level is the only detail left in the file, the sample template still has one person at level 6 and 3 people at level 5. Anyone who knows the org chart can work out who they are.
The UK's data protection regulator ran into the same problem in its own example of masking employee data. Its team could still identify some people in groups of 3, so it set the minimum group size at 5.
So here's the rule I recommend. Look at the details you plan to upload and count how many employees share the exact same ones. For example, if your file only shows job level, count how many people are at each level. If fewer than 5 people share the same details, leave them out of the upload and review their pay yourself. Keep in mind that every column you add splits people into smaller groups.
In my sample template, this rule left out the 4 people at levels 5 and 6. I'd also leave out your executives, even if you have 5 or more of them, because it's easy to guess which salary belongs to which executive. In total, that's 9 of the 47 employees to review manually.
If most groups at your company have fewer than 5 people, masking won't protect anyone. At that size, stick to your spreadsheet.
How to Anonymize Employee Data in 6 Steps
You'll work with 2 files. The first is the key file, which holds your full employee data and the alias for each person. This file never goes into an AI tool. The second is the upload file, which holds the aliases and only the columns your analysis needs. This is the only file you upload for AI analysis.
Masking data this way is called pseudonymization. Anyone with the key file can match the aliases back to names, which is why you keep the key file to yourself.
Step 1: Decide on Your Question First
First, decide on the specific question you need answered before exporting data. This question determines which columns to include in your upload file.
For example, to find out who is paid outside their salary band or near the top or bottom of it, you'll look at their compa-ratio. Compa-ratio is calculated by dividing an employee's base salary by the midpoint of their band. A compa-ratio of 0.85 means they earn 15% less than the midpoint.
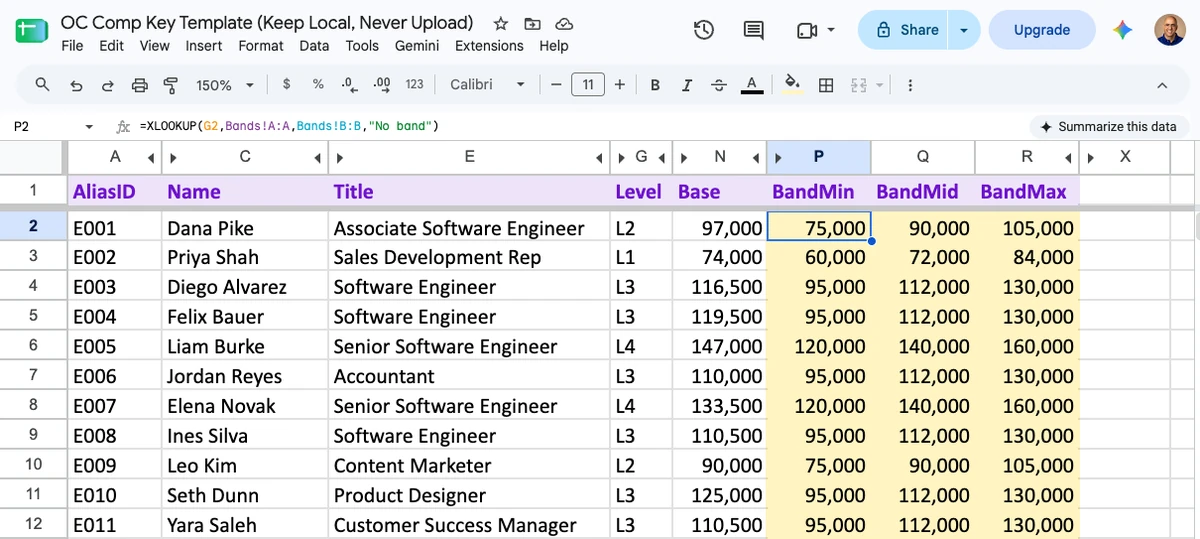
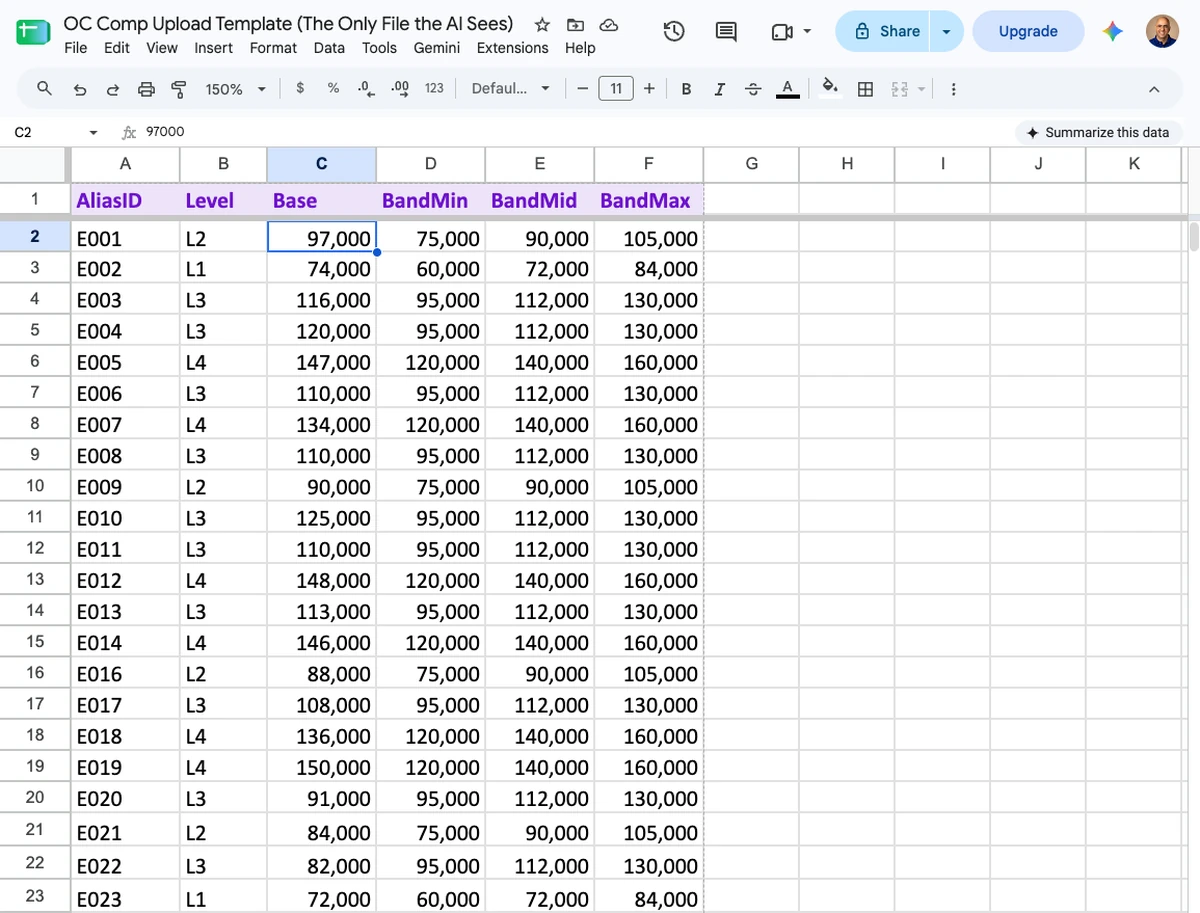
To answer this question, include 6 specific columns in your upload file: AliasID, Level, Base, BandMin, BandMid, and BandMax. Keep these exact column names because the prompt in Step 4 relies on them. If your HRIS export doesn't include salary bands, you can add them using an XLOOKUP formula, as shown in the template's Bands tab.
If you don't have salary bands by level yet, build those before you use this method.
Step 2: Assign Aliases in the Key File
Export your full employee list from your HRIS into a new Google Sheet. Name this file clearly so nobody uploads it by mistake, such as "Comp Key - Do Not Upload." This will be your key file. Then follow these steps:
- Add a new column, enter =RAND() in the first row, and fill it down to assign a random number to each employee.
- Sort the entire sheet by this column to shuffle your list.
- Add another column, enter ="E"&TEXT(ROW()-1,"000") in the first row, and fill it down to create aliases like E001, E002, and E003.
- Copy the alias column and paste it back as values only so the aliases stay fixed.
- Delete the random number column.
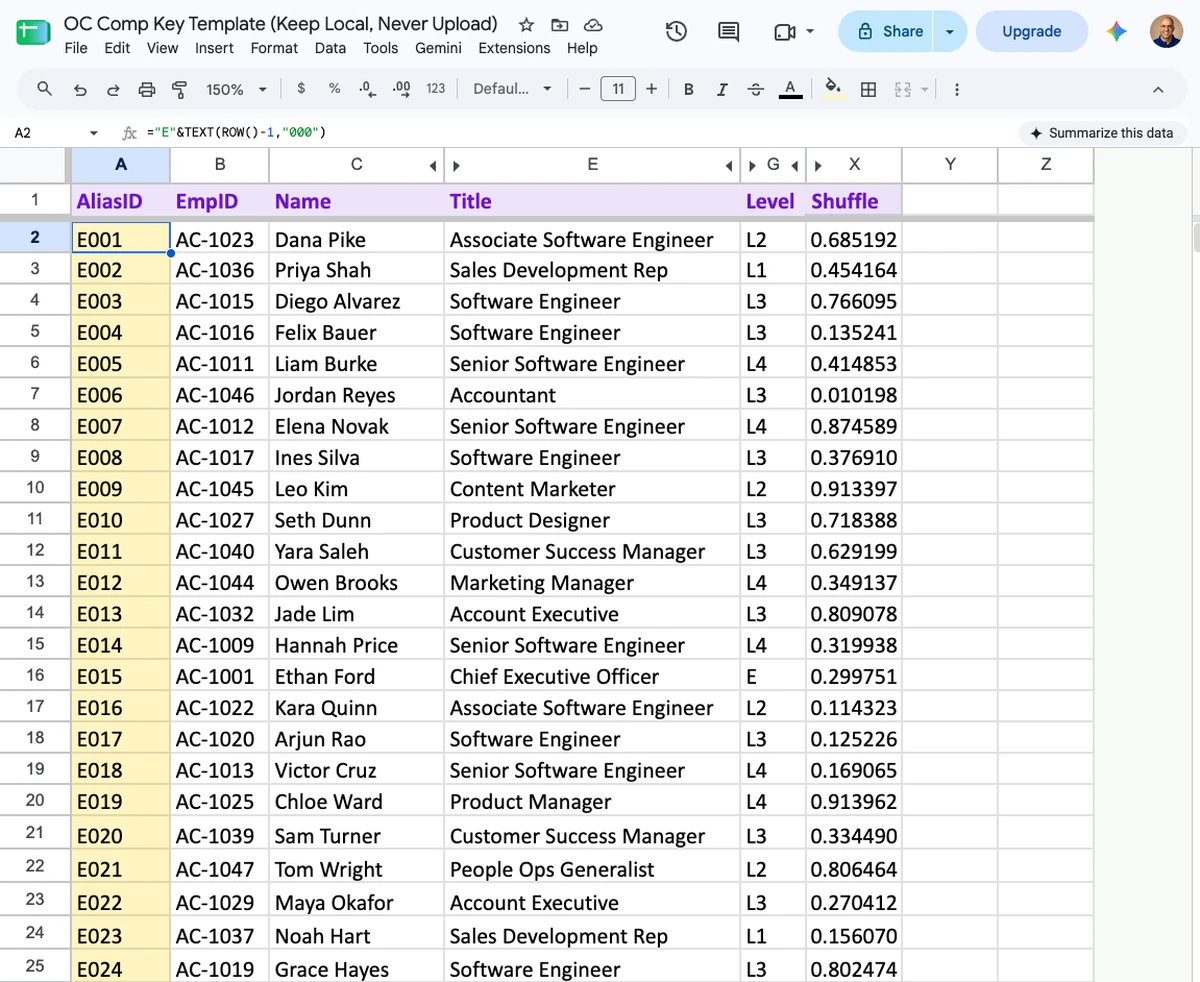
Always shuffle the list before assigning aliases, as alphabetical or hire-date order can easily reveal identities.
Generate new aliases for each analysis because reusing them allows anyone viewing multiple uploads to track the same individual across files.
Step 3: Build the Upload File
Create a separate Google Sheet for your upload file. Never add it as a new tab in your key file, because AI tools access every tab in a workbook when you upload it.
Copy the AliasID column along with only the specific columns needed for your question from the key file. This keeps every row aligned with its correct alias. Then follow these rules:
- Remove direct identifiers: Delete names, emails, and employee IDs.
- Replace job titles: Use the job level instead of the title.
- Group dates into ranges: Group hire dates into broader tenure ranges, such as under 1 year, 1 to 3 years, or 3+ years. Include tenure only if your analysis requires it.
- Broaden locations: Convert specific cities into broader pay zones. Include location only if your salary bands vary by region.
- Delete free-text notes: Remove all notes and comments columns. For example, two notes in the sample file mentioned colleagues by their first names.
- Round base salaries: Round base pay to the nearest $1,000 using =ROUND(C2,-3). This alters compa-ratios by less than 0.01 while preventing exact salary matching.
- Exclude small groups: Remove any employee belonging to a group of fewer than 5 people and review their compensation manually instead.
To download your upload file as a CSV in Google Sheets, click File > Download > Comma-separated values (.csv). This downloads only the tab you are currently viewing. Before uploading it to an AI tool, open the CSV file and search for "@" as well as a few employee first names to ensure no real names or email addresses were left behind.
Step 4: Run the Analysis
Before you upload anything, check your company's AI policy. Use a business or enterprise account, and make sure the setting that lets the AI tool train on your data is turned off. Most tools have this option in their privacy settings. If you're not sure where to find it, ask your IT team or whoever manages your company's AI tools. If you only have a personal account, turn off the same setting before you upload anything. Security is the first of the criteria I use to evaluate any HR AI tool.
Then upload the CSV with this prompt:
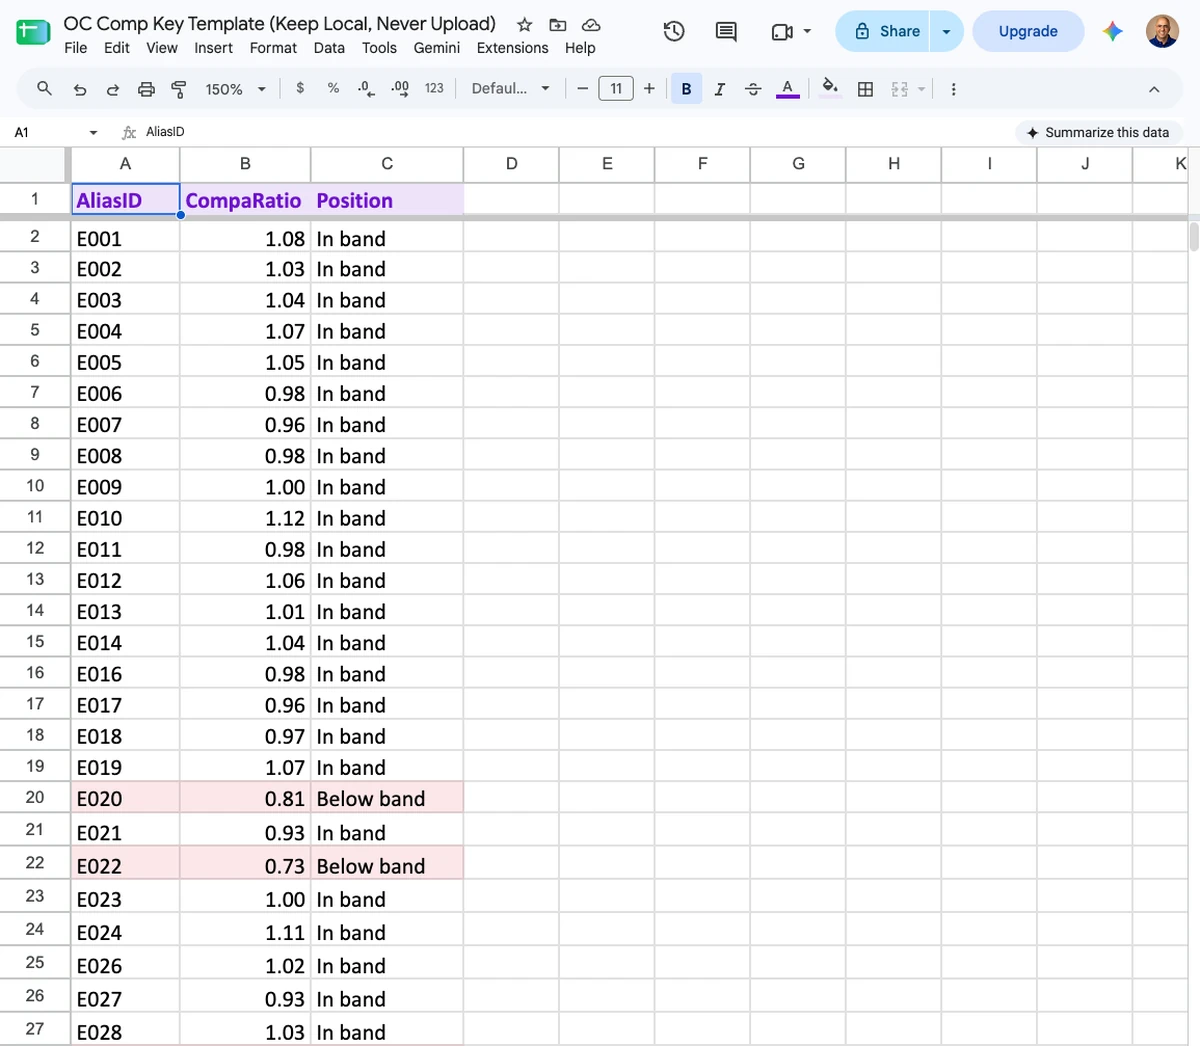
The attached CSV has one row per employee. AliasID is an anonymous ID. For each row, calculate compa-ratio as Base divided by BandMid, rounded to 2 decimals.
Label each row "Below band" if Base is under BandMin, "Above band" if Base is over BandMax, and "In band" otherwise. Return a table with exactly 3 columns: AliasID, CompaRatio, Position. Copy every AliasID exactly as it appears in the file. Do not reformat, rename or skip any ID.
After the table, list every row that is below band, above band, or has a compa-ratio under 0.90 or over 1.10, and explain what stands out.
Asking the AI to copy each AliasID exactly ensures that the formula in Step 5 matches every row. The summary list at the end also prevents you from having to manually search for outliers.
Step 5: Reconnect Names Using XLOOKUP
Now match the AI's results back to your employees in a few quick steps:
- Create a new tab called AI Results in your key file, and paste the table from the AI starting in cell A1.
- Confirm that the AI's response has the exact same row count as your upload file (in this example, 38 rows).
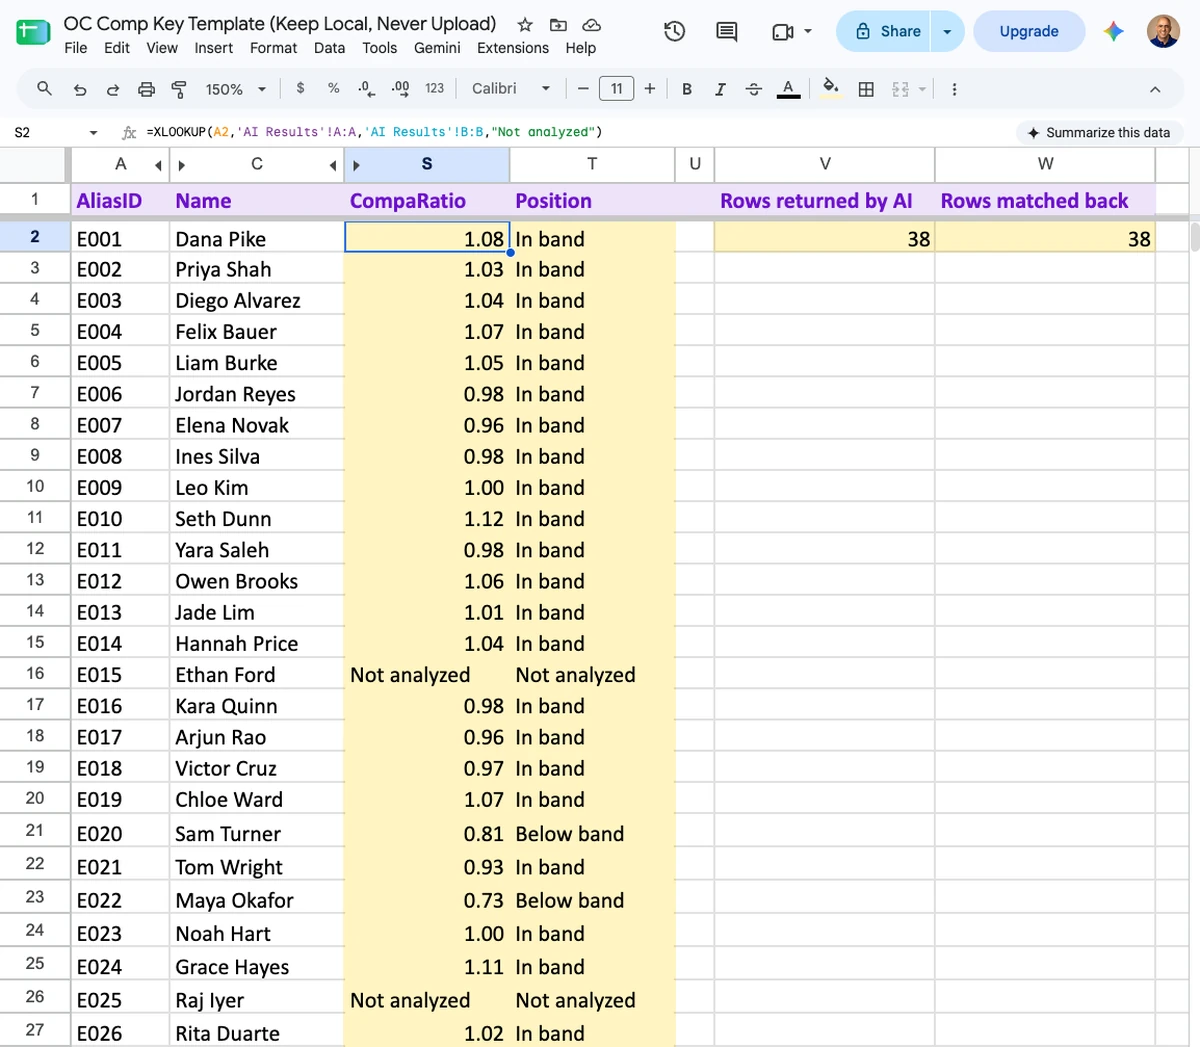
- In row 2 of your key file's first empty column, enter =XLOOKUP(A2,'AI Results'!A:A,'AI Results'!B:B,"Not analyzed") and copy it down. This searches for each alias in the AI results and returns the compa-ratio.
- In the adjacent column, use the same formula but change the target range to 'AI Results'!C:C to bring in each employee's band position.
- Verify how many rows matched by adding =COUNTIF(T2:T48,"<>Not analyzed"). Adjust the range to reflect your band position column if needed.
Employees on your manual-review list will show "Not analyzed," as intended. The total count from your formula check should equal the number of rows returned by the AI (38 in this sample). If your count is lower, check if an alias was returned in a different format (e.g., E1 instead of E001) and correct it in the AI Results tab so the formula updates automatically.
Step 6: Spot-Check the Math
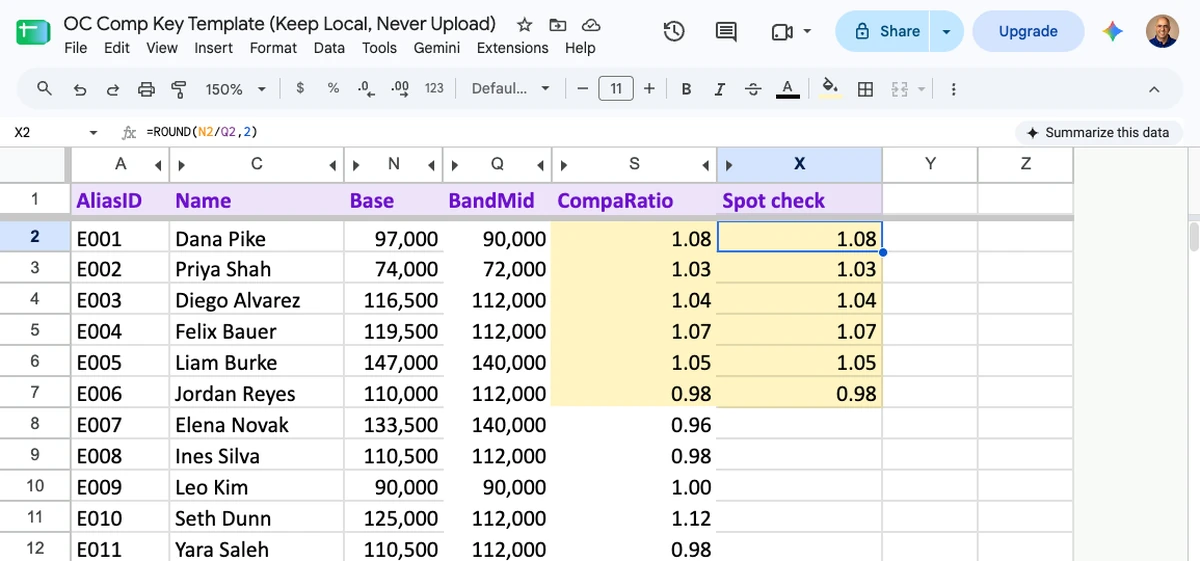
Pick 5 rows and divide the base salary by the band midpoint yourself. Since you are making pay decisions based on these numbers, double-check that they are accurate before sharing them with anyone else.
What the Compa-Ratio Analysis Shows
In the sample company from my template, 5 employees fell outside their pay band: 3 were paid below it, and 2 were paid above it. Another 3 employees stayed inside their band but had a compa-ratio under 0.90 or over 1.10. The largest gap was an Account Executive with a compa-ratio of 0.73, meaning they earn 27% below the midpoint. Because the formula matches the AI's results back to employee names, you can go straight from the summary to specific names and decide how to address each case.
If employees paid below their band have worked at the company longer than recent hires in the same role, you are likely facing pay compression. I covered how to handle this in my episode on pay compression at a startup.
What to Do This Week
Keep in mind that job titles, hire dates, and locations can reveal an employee's identity just as easily as their name. Adding more columns to your file splits employees into smaller groups, making them easier to identify. Always keep your key file out of AI tools, and verify group counts before taking action on any results.
- Practice on the sample: Download the template and practice all 6 steps using the sample data before working with real employee records.
- Check your AI account settings: Verify which account you plan to use and confirm that data training options are turned off.
- Write your primary question: Choose one compensation question to answer and list only the essential columns required to answer it.
- Identify manual-review groups: Identify any employee groups with fewer than 5 people so you can review their pay manually.
- Apply the method to real data: Use this workflow on your actual compensation file ahead of your next pay review cycle.
I cover compensation in depth in the Total Rewards module of The Startup HR Operating System, which launches in Q1 2027. Enrolling now at the $199 early access price gets you access to that module as soon as it releases, before the full course price increases to $499.
FAQ
- Is it safe to upload employee data to ChatGPT? Only upload data after it has been masked, and make sure to use an account where training on your data is turned off. Always keep the key file that matches aliases back to real names completely out of any AI tool.
- Does masking make the data completely anonymous? No. Masked data is considered pseudonymized, which means it is protected but still legally classified as personal data. Because anyone with the key file can re-identify individuals, European regulators treat pseudonymized data as personal data.
- Does this method work with Claude or Gemini? Yes. You can follow the exact same steps and use the same prompt in any AI tool.
- Should I reuse the same aliases for future analyses? No. Create fresh aliases every time you analyze data. If you reuse the same aliases, someone comparing two separate uploads could track an individual across both files.
- Why not use employee IDs instead of aliases? Employee IDs appear across other company systems and reports. Anyone with access to your HRIS could easily match those IDs back to real names, defeating the purpose of masking.